How to Create Pages For Your Canvas Course
How To Create and Use Pages
Pages are the quickest and easiest way to post content in Canvas. You can add any type of content into a page, including text, images, embedded videos, and links both to areas inside and outside the course, including linking students directly to assignments, quizzes, and more. With pages, you can deliver a wide variety of content to your students, and customize the look and feel of your course by creating a Home Page (see below), or by customizing the order of your pages using Modules. Creating content in a Page uses the Rich Content Editor (which also appears in many other areas of Canvas, such as Announcements, Discussions and Assignments).
Open Pages
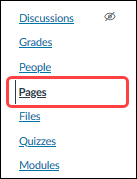
In Course Navigation, click the Pages link.
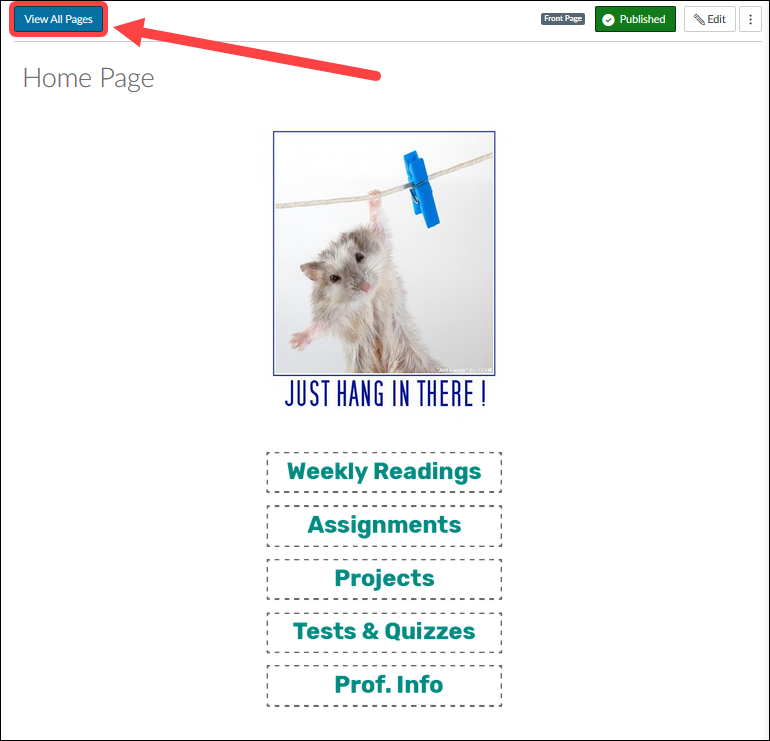
If you have a Home Page set already, this will take you straight to your home page. To select a page from the Pages Index, click the View All Pages button. If you do not have a Front Page select, you will be taken to the Pages Index.
Page Index and Add or Edit a Page
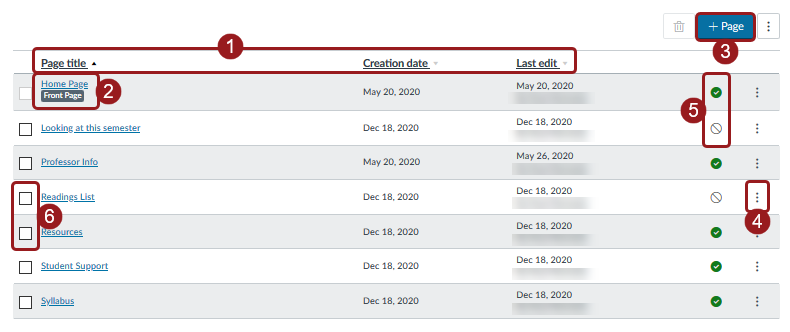
Once you are in your Pages Index, you can create a new page by clicking on the +Page button (3).
You can sort your pages by title, creation date, or last edited date by clicking on the column headings (1). If you’ve set a page to be your course’s Front Page, it will have a small Front Page label under it (2).
Clicking on the three vertical dots (4) will give you more options for that page, such as setting a front page, sharing, or exporting. Learn more about page options on the Canvas support site. You can quickly publish or unpublish a page by clicking on the circle (5) – a green check mark indicates it is published while a grey circle-backslash symbol indicates it is unpublished. You can bulk delete pages by clicking on the check boxes (6) to the left of each page and then clicking the garbage can icon next to the +Page button.
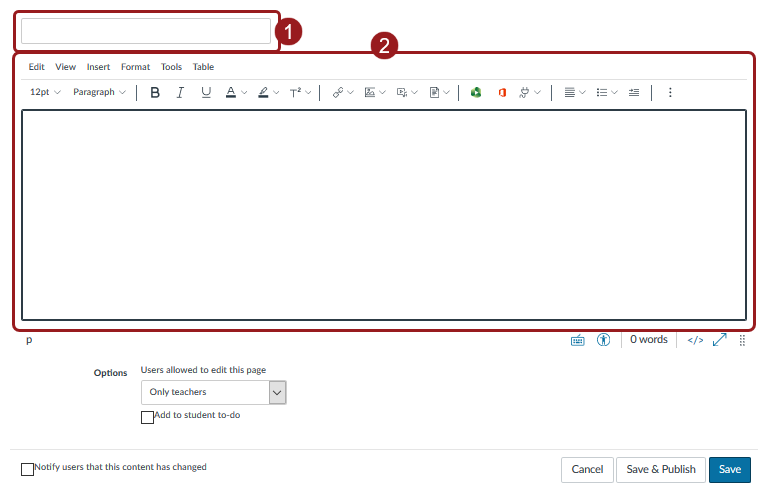
Type in the title of your page (1). Use the Rich Content Editor (RCE) (2) to customize and build your content. Learn more about the RCE’s capabilities.
You can also open an existing page and click on the Edit button to modify it.
![]()
Insert Link
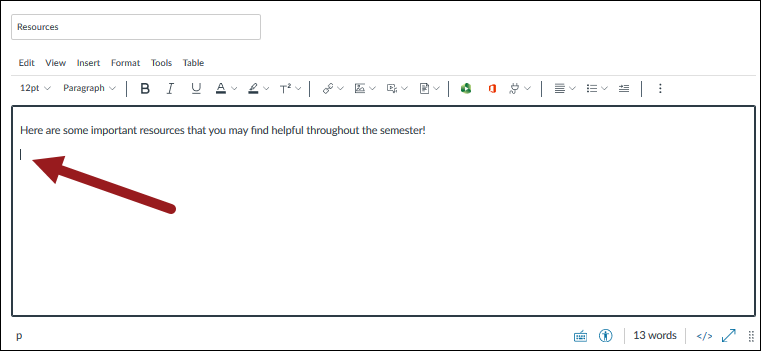
In the RCE, click once to place your cursor where you want to insert the link.
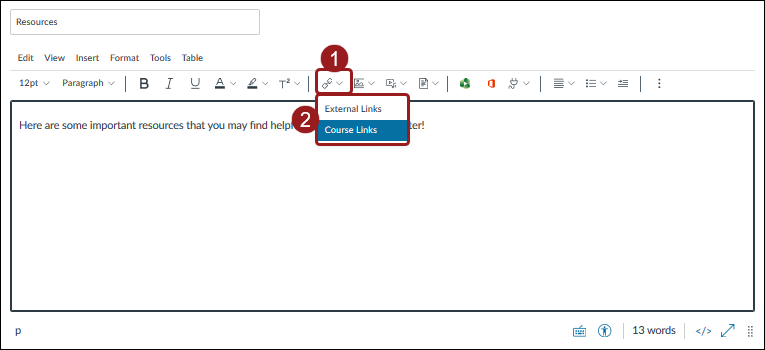
Clicking on the chain link icon (1) itself will prompt a popup to insert an External Link (any link outside of the current course). Click on the down arrow to the right of the chain link icon to choose from a drop-down menu (2) and click on Course Link to add a link directly of other course content (more detail below)
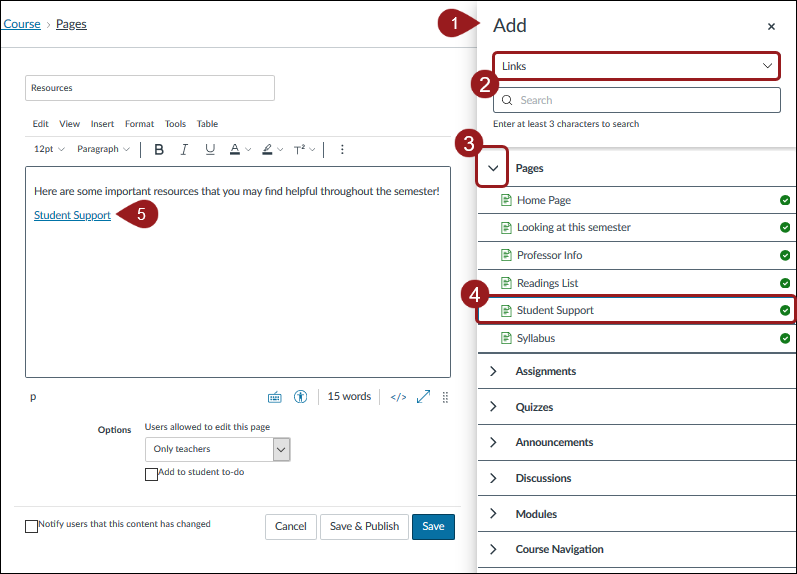
If you want to add a Course Link, a right-hand sidebar menu (1) will pop out. Choose between Links or Files (2), but most likely your content will be in Links. Click on the drop down arrow (3) next to a category to choose the specific content (4) you wish to link to. Once you’ve clicked on the content you want to link, a yellow bar will flash where the link was placed and your link will appear (5) where you placed your cursor.
Edit Page Settings
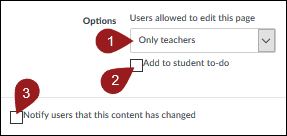
You can change who can edit this page by choosing from the drop down menu (1). Options include only teachers, teachers and students, or anyone.
You can add the page to the student to-do list by selecting the Add to student to-do checkbox (2). When you add a page to the student to-do, the to-do displays in the student’s to-do list as well as the in the course calendar and modules.
You can also notify users that content has changed by selecting the Notify users that this content has changed checkbox (3).
Save and Publish
If you are ready to publish your page, click the Save & Publish button (1). If you want to create a draft of your page, click the Save button (2).
Note: If you try to navigate away from a page without saving, you will generate a pop-up warning.

When your page is saved in a draft state, you can return to the page and publish it at any time by clicking the Publish button. The button will change from gray to green.

Pages Help for Instructors
Creating and Managing Pages
- How do I use the Pages Index Page?
- How do I create a new page in a course?
- How do I publish or unpublish a page as an instructor?
- How do I duplicate a page in a course?
- How do I change the name of a page in a course?
- How do I edit a page in a course?
- How do I delete a page in a course?
- How do I view the history of a page in a course?
Adding Content to Pages
- How do I link to other Canvas pages in a course?
- How do I upload a PDF to a page in a course?
- How do I create a file link in a page in a course?
- How do I embed a video in a page in a course?
Viewing and Sharing Pages
- How do I set a Front Page in a course?
- How do I use the Microsoft Immersive Reader when viewing a page as an instructor?
- How do I use Direct Share to copy a page to another course?
- How do I use Direct Share to send a page to another instructor?
- How do I add a page to the student To-Do list as an instructor?
Pages Help for Students
- How do I view Pages as a student?
- How do I create a new page in a group?
- How do I change a page name in a group?
- How do I edit a course page as a student?
- How do I edit a page in a group?
- How do I delete a page in a group?
- How do I upload a PDF to a page in a group?
- How do I link to other pages in a group?
- How do I embed a video in a page in a group?
- How do I create a file link in a page in a group?
- How do I view the history of a page in a group?
- How do I use the Microsoft Immersive Reader when viewing a page as a student?
