How to Copy Content Between Canvas Courses
A wide range of course content can be copied from one course to another, either all at once, in groups of select items, or one-at-a-time. You can also view and download a printable version of this guide (PDF – 221KB).
We do recommend importing content selectively, which means that you are choosing to bring over only some of your course content versus all of your course content at once. This can make handling your course content easier for you while you are still learning how to navigate and use Canvas, and allow you to leave some older, no-longer-needed content behind.
- Go to the course that you want to copy the content into. In Course Navigation, click Settings.

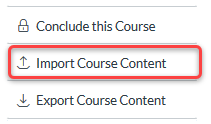
- Click Import Course Content.

- In the Content Type drop-down menu, select the Copy a Canvas Course option.

- In the text box next to Search for a course, start to type the name of the course you want to copy from–once you start typing, a dropdown list will begin to populate with courses that you are enrolled in that match what you’ve typed.

- Click either the All content or Select specific content (recommended) option.

- If you check the Adjust events and due dates box, you will get some further options for adjusting due dates on imported course content. Be advised that the due dates that get adjusted through this process refer to any due dates that you inputted on Assignments and Quizzes in Canvas itself. It will not adjust any dates embedded in documents such as your Syllabus or a course summary page.
- You can easily access the bulk date adjustment again after the copy is completed. You do not need to do it at the time of the copy (and most people do not). To access the bulk date editing feature later, go to your assignments page, click the options (…) button in the top right corner, and choose Edit Assignment Dates. Full instructions are available.
- Click the Import button.

- If you chose a selective import process, you will see the process as queued for a short time and then it tell you that it is Waiting for Selection. Click Select Content.
- A popup window will appear and you can check off only the content you wish to import. We recommend that you leave the following unchecked:
- Calendar Events, as this refers to any Zoom sessions, appointments, and other events that you had scheduled for the course you are copying from.
- Announcements, as these are usually specific to one delivery of a course (such as OMET course evaluation announcements).
- Course Settings. While sometimes appropriate to import, it’s usually best not to. It retains things like the old course’s expiration dates, custom integration configurations (such as textbook links), grade posting policy, and course image, or some settings which might not be able to be turned off once turned on. These may not be desired and also will perpetuate your previous custom settings without adapting to new Canvas system-wide settings.

- Click the Select Content button.

About Importing/Copying Videos and other Integrations
Panopto Videos
Canvas and Panopto are separate systems and doing a course import (copy) in Canvas does not copy your videos in your course’s Panopto folder. Depending on how you used Panopto with your course, you may be in one of the following situations:
- Your videos are in a Panopto folder for your course. (Clicking Panopto Video from your course navigation menu shows you your course videos.)
- You used the Panopto tool to embed your videos into your modules/pages. (You used the directions from Using Panopto with Canvas.)
- Your videos are shared or embedded in Canvas using the Panopto sharing link.
If you do not remember, you can ask us for help. It can be difficult to tell #2 and #3 apart once they are set up.
Each of these situations leads to a different result after doing a course import.
- You will need to use Panopto to copy your videos. See our How to Copy Multiple Videos at Once in Panopto page for how to do this.
- Often the best scenario, these should be good. It’s always good to ask a student in the new course to verify.
- These may or may not work depending on your Panopto permissions. If the video was set to a more public permission, it will probably work. If not, your students will not be able to view the video (and Panopto may send you notifications of them asking for permission). We would suggest switching to one of the other two methods, though you may alternatively set your video to public.
Other Integrations
Performing a Canvas course import does not cascade to the integrations (Top Hat, textbooks, etc). For most integrations, your new course will need to be set up for each integration again. Some integrations (like Top Hat and Gradescope) have tools to help you copy courses inside that system as well. If you copied your course with “Course Settings” enabled, some rare integrations will link to your old course. We suggest not importing these settings so there is no risk of this issue.
Always test every integration after a course import to do any necessary configuration and to catch any errors.
